How to Choose a Schick Dental Sensor for Global Buyers
Choosing a schick dental sensor is not simply a specification exercise. It is a clinical, technical, and operational decision.
Global buyers must examine image quality, sensor size, software compatibility, warranty coverage, and local service access. A sensor may produce sharp radiographs yet create workflow problems in a busy clinic. Check the connector, imaging platform, driver requirements, and integration with existing dental software. Small details matter. A few minutes saved during positioning can improve patient comfort and daily productivity.
Dental technology educator Dr. Paul Feuerstein is known for saying, “Technology is only as good as the person using it.” This principle remains useful when comparing a schick dental sensor with competing systems. Training, positioning technique, infection-control routines, and staff confidence influence practical results. Specifications alone cannot guarantee dependable diagnosis.
Look closely at the physical design. Can staff grip the sensor securely with gloved hands? Does the cable tolerate repeated movement? Are protective sleeves easy to obtain in the buyer’s region? These questions often receive less attention than resolution figures. That is a weakness in many purchasing plans.
No buying guide removes every compromise. A smaller sensor may improve comfort but require careful positioning. A larger sensor may offer easier coverage but feel less comfortable for some patients. Buyers should request demonstrations, review service terms, and test workflow compatibility before committing. The right choice is rarely the most impressive product. It is the one that remains reliable during ordinary clinical pressure.
Define Clinical Fit: Size 0–2 Sensors and Bitewing Coverage
For global buyers, clinical fit starts with the patient’s mouth, not the product label. Size 0 sensors suit small children and narrow arches. Size 1 can balance comfort and coverage. Size 2 usually offers broader posterior bitewing coverage for adults. Nominal dimensions often approach 22×30, 24×33, and 27×37 millimeters, but active areas vary. Check the technical drawing, not only the size number. The WHO Global Oral Health Status Report 2022 estimates that 2.5 billion people have untreated caries in permanent teeth. That burden makes dependable interproximal imaging important across age groups.
Bitewing coverage depends on positioning, sensor thickness, holder design, and beam collimation. A size 2 sensor may capture two molar contacts in one exposure. However, a shallow palate or sensitive child can make it impractical. Smaller sensors may reduce gagging, but they can require extra images. That increases appointment time, radiation exposure, and retake risk. FDA and ADA selection guidance supports matching receptor choice to the diagnostic task, patient size, and clinical workflow. Ask suppliers for active-area diagrams, pixel pitch, barrier compatibility, and retake-rate data. Test posterior contact visibility with your own phantom. Real mouths are less cooperative. I would not treat “universal fit” as proof. It can be an expensive shortcut.
How to Choose a Schick Dental Sensor for Global Buyers - Define Clinical Fit: Size 0–2 Sensors and Bitewing Coverage
| Sensor Size |
Typical Patient Fit |
Typical External Dimensions
(Approx.) |
Typical Active Area
(Approx.) |
Recommended Clinical Uses |
Bitewing Coverage |
Selection Considerations for Global Buyers |
| Size 0 |
Small children and patients with very small arches. |
Approximately 27 × 20 mm; actual dimensions vary by housing design. |
Usually slightly smaller than the external sensor housing because of the protective casing and electronics. |
Anterior examinations, primary dentition, limited-mouth-opening cases, and localized pediatric imaging. |
Limited posterior coverage. Often suitable for selected pediatric bitewings rather than a full adult posterior bitewing series. |
Choose when comfort and intraoral positioning are more important than maximum image coverage. Confirm compatibility with pediatric positioning holders. |
| Size 1 |
Children, adolescents, and adults with smaller oral cavities. |
Approximately 30 × 22 mm; dimensions differ among manufacturers and models. |
Commonly provides a modestly larger imaging field than size 0 while remaining relatively easy to position. |
Mixed dentition, anterior imaging, selected premolar views, and smaller-patient bitewing examinations. |
Can capture pediatric and some narrow premolar bitewings; coverage may be insufficient for a complete adult molar region in one exposure. |
A practical compromise when a clinic serves both pediatric and small adult patients. Check the holder system and cable exit orientation before purchase. |
| Size 2 |
Most adolescents and adults with average or larger arches. |
Approximately 36 × 27 mm; exact measurements vary by product design. |
Provides the largest common intraoral sensor field among sizes 0–2. |
Adult periapicals, posterior examinations, routine endodontic imaging, and general diagnostic radiography. |
Usually the preferred size for adult premolar and molar bitewings because it offers broader horizontal and vertical coverage. |
Best general-purpose choice for mixed adult practices, but assess patient comfort, gag reflex, mouth opening, sensor thickness, and sterilization workflow. |
Important: Size labels are not fully standardized across manufacturers. Before purchasing, compare the stated active imaging area, total housing dimensions, sensor thickness, cable design, positioning-holder compatibility, software interface, warranty terms, and local regulatory requirements. The dimensions above are common industry ranges rather than specifications for a particular brand or model.
Compare Image Data: Pixel Pitch, MTF, DQE, and lp/mm Resolution
When global buyers compare an intraoral dental sensor, image data deserves more attention than a glossy specification sheet. Start with pixel pitch, measured in micrometers. Smaller pixels can capture finer sampling, but they do not automatically produce sharper anatomy. The scintillator, electronics, software, and display also affect visible detail. Numbers matter. A 20-micrometer pitch may look impressive, yet poor signal control can reduce practical value.
MTF shows how well image contrast survives at different spatial frequencies. A strong MTF curve usually means edges remain clearer, especially around root tips and fine bone patterns. DQE measures how efficiently the sensor converts radiation into useful image information. Higher DQE can support diagnostic quality at a lower exposure, but results depend on the test method and operating conditions. Be careful with lp/mm claims. Reported resolution may come from a line-pair phantom, while clinical sharpness depends on motion, processing, and noise.
Ask for MTF and DQE data at stated exposure levels, not isolated figures. Request sample images, test reports, and the exact lp/mm measurement method. Compare identical anatomy, exposure settings, and software versions. I have seen buyers select the highest advertised resolution, then discover weak contrast in everyday images. That mistake is easy to make. Have experienced clinicians review subtle structures on a calibrated monitor. The comparison remains imperfect, but transparent testing makes the decision more reliable.
Verify Compliance with IEC 60601-1, ISO 10993, and ISO 14971
Choosing a dental sensor for international use requires more than checking image quality or cable length. Ask for evidence that the device was assessed against IEC 60601-1, ISO 10993, and ISO 14971. These standards address different risks. IEC 60601-1 focuses on basic electrical safety and essential performance. ISO 10993 evaluates biological safety based on patient contact, tissue exposure, and contact duration. ISO 14971 supports a documented risk-management process throughout the device lifecycle.
Review the intended-use statement carefully. A sensor placed inside the mouth may need a different biological evaluation from a device with indirect contact. Request test reports, declarations, risk-management records, and details of applicable editions. Check whether the reports identify the exact model, accessories, and materials. A certificate alone may not explain every limitation. Local requirements can also add obligations, even when international standards are referenced.
Tips: Keep a compliance file for each sensor model. Compare the device label with the technical documents. Confirm cleaning instructions, protective barriers, and connector safety before installation. Ask how software updates affect risk controls. Independent laboratory evidence is useful, but it should match the final production design. I have seen purchasing teams overlook accessory changes, then discover that an old report no longer reflects the supplied configuration. That gap is easy to miss. Recheck it.
How to Choose a Dental Sensor for Global Buyers
Reference editions for verifying electrical safety, biological evaluation, and risk management.
How to use this chart:
Before purchasing a dental sensor, request the supplier’s applicable test reports, technical documentation, biological evaluation evidence, and risk-management records. The years shown identify the referenced editions and do not represent a certification score or proof of conformity.
Reference editions:
IEC 60601-1:2005+A1:2012+A2:2020, ISO 10993-1:2018, and ISO 14971:2019.
Check FDA 510(k), CE Marking, and Global Regulatory Documentation
Global buyers should verify regulatory evidence before comparing image resolution, cable length, or software features. A dental sensor’s FDA 510(k) clearance should match its intended use, technology, and labeling. Clearance means substantial equivalence, not blanket approval for every market or clinical application. Search the FDA 510(k) database, then request the complete decision summary, indications for use, and current labeling from the supplier.
CE Marking requires closer examination under the EU Medical Device Regulation. Check the EU Declaration of Conformity, risk classification, notified-body involvement, Basic UDI-DI, and post-market surveillance procedures. The technical file should also reference applicable standards, such as ISO 13485, IEC 60601-1, IEC 60601-1-2, IEC 62366-1, and relevant ISO 10993 tests. Certificates can expire. Verify dates and scope.
Documentation gaps are common. A translated brochure cannot replace an official instruction manual, electrical safety report, cybersecurity file, or local registration record. WHO’s Global Oral Health Status Report 2022 estimates that nearly 3.5 billion people live with oral diseases, increasing demand for dependable diagnostic equipment. However, demand does not reduce compliance duties. In procurement reviews, I would compare the sensor’s exact model number across every document. One mismatch can delay customs clearance or installation. I would also question unsupported claims about “global approval.” That phrase is convenient, but inaccurate. Local authorities may require additional representatives, language versions, vigilance reporting, or import licenses. Some paperwork still needs clarification. That is a reason to pause, not guess.
Calculate Five-Year TCO: Warranty, Repairs, Software, and Integration Costs
Choosing a dental sensor requires a five-year total cost of ownership review, not just a purchase-price comparison. Build a spreadsheet with acquisition, warranty extensions, repairs, software subscriptions, calibration, training, and integration labor. A practical example starts with a $2,400 sensor, $300 annual software, and $600 for initial integration. Two out-of-warranty repairs at $650 each raise the five-year cost to $6,250. That figure excludes downtime.
Warranty terms deserve close reading. Does coverage include cable damage, image artifacts, shipping, and loaner equipment? One failed sensor can interrupt several appointments, especially in a small clinic. The 2024 Cost of a Data Breach Report recorded an average healthcare breach cost of $9.77 million, showing why secure software integration cannot be treated as a minor expense. Ask whether updates support encrypted transfer, user controls, audit logs, and existing imaging systems. Verify these claims in writing.
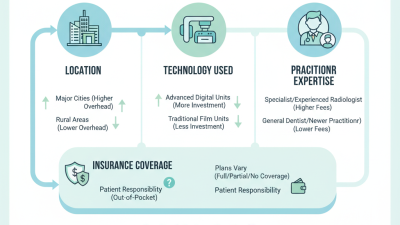
Repair history is harder to predict. It is also where budgets become imperfect. A useful model adds a 10–15% contingency for unexpected failures, staff retraining, or compatibility work. That allowance may feel excessive. It is still safer than assuming zero downtime. Request three years of repair data, response-time targets, and the hourly cost of an unavailable operatory. For global buyers, include local taxes, freight, currency movement, and regional service availability. A low invoice can become an expensive workflow decision.